Showing posts with label camera techniques. Show all posts

6.25.2009

Oh, what a difference a daylight balance makes.


Simon_tungst
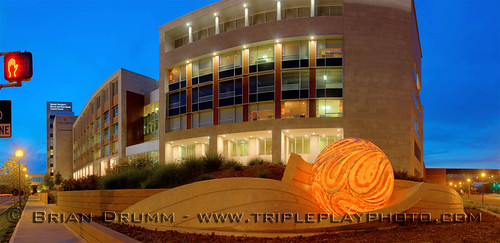
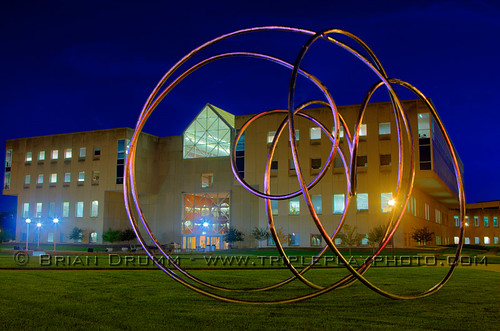
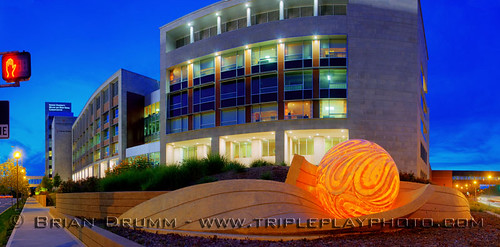
Here are two more HDR's from last Saturday night, this time of the Melvin and Bren Simon Cancer Center, part of the Indiana University School of Medicine in Indianapolis, IN. In the case of the photo above, I set the white balance on the camera to the Tungsten setting, although often I will set the white balance with a gray card based on whatever weird lighting is on the scene.

Compare that with the version shot with daylight balance below. Both look pretty good, and it's a matter of preference, but I like the heightened contrast between warm and cool colors, as well as the deeper blue sky, in the tungsten version.

Simon_daylight

The software I use to create and tone-map HDR's, Photomatix, does allow adjustment of white balance, but I find that setting rather limited in the range of adjustments. Therefore, I always consider doing multiple exposure series at different white balance settings.

HDR with a little "Strobist" thrown in


East Gate-westate
Last Saturday evening, my friend Ron Wise and I did a little exploring on the campus of IUPUI (Indiana University-Purdue University at Indianapois) for some HDR opportunities. I actually had an assignment from the University for some general photos of a few select campus buildings and some sculpture art on extended loan from museums.

One shot on my list was "East Gate/West Gate" a very large (about 25 feet tall) tubular structure that almost looks as though it could have been inspired by and M. C. Escher illustration. One of my acquaintances, who shall remain nameless, described it as "two ampersands in a coital entanglement." (Actually, that's a paraphrase on my part to avoid usage of a certain 4-letter verb which often doubles as an adjective.)

Anyway, where the client was no doubt visualizing a standard daylight photo, I wanted to explore this unique shape under night lights.

The result is at the top.

The building in the background is University Library, and an HDR image preserves detail in the lit interior as well as the exterior shadows. The metal of the sculpture did a good job of picking up the other light sources in the area, but with the camera still on the tripod, I added pops from a gel-ed Vivitar 283 to put some color into the image. Ron was pressing the shutter release and watching to be sure I didn't venture into the frame as I held a Pocket-Wizard-fired Vivitar 283. For these exposures, I used a much shorter shutter speed to capture mostly just the light from the flash and not a lot of ambient light.

I hit it from all four corners in separate exposures with both a red and blue gel, and also with a full CTO, which was effectively white light since my white balance was very close to Tungsten light. In post production, I layered two exposures with the blue gel at camera left and two with the red gel at camera right into a single image with the "Lighten" blending mode. This varied the colors from red to purple to blue. The flash image was layered over the HDR to impart the color onto the sculpture, again with the "Lighten" blending mode.

UPDATE: Here is an interesting video that gives a little information about the East Gate/West Gate sculpture, created by artist Sasson Soffer (1925-1973), and shows the process of moving it to it's current location by helicopter. It includes an interesting aerial tour of downtown Indianapolis.

2.17.2009

Big doin's at PocketWizard


There was some chatter on the Paul C. Buff forums recently that PocketWizard would make a big announcement soon. Like I usually do when I hear such a thing, I religiously checked their website for several days and when I keep seeing same old same old day after day, I gave up checking one or two days before "THE EVENT." (Seriously, I must have pinged the Canon website for 60 consecutive days, but gave up on it exactly two days before the 5D Mark II announcement.)

The event in this case is the announcement of the MiniTT1 transmitter and FlexTT5 tranceiver radio flash triggering devices. The news here is that these units allow TTL flash operation over wireless RF channels, which will be much more reliable than the about as expensive but dicier infrared wireless systems marketed by Nikon and Canon. For starters, this system is for Canon only, but Nikon-compatible gear is on the way. I won't re-hash features of the units here, as they are covered very well at the Strobist blog.

Personally, I've never been particularly happy with the consistency of results I've gotten with TTL flash equipment. Being an old hand (a VERY old hand) with manual operation of Vivitar 283's, I'm more pleased with the results I get working in "old school" manual. Therefore, I nearly said "big deal" at the news and went on with my day.

But, fortunately, I read on.

These units have the capability of operating in what is called "Hypersync" mode. This is of high interest to sports shooters like myself because it MAY allow using higher flash sync speeds with studio flashes triggered by these units. The power of my AlienBee's B800 units are "just enough" for some of my arena lighting situations, so the ability to cheat the shutter speed upward to cut out a little more ambient light could prove huge in certain situations, such as the IUPUI Natatorium (below).

The manual for these units says mileage may vary with different flash equipment and different cameras. Therefore, I will need to finagle a test situation to figure out if I can squeeze, for example, 1/400 or 1/500 sync speed with my Canon 40D (1/250 stock sync speed), but every single click upward on the shutter speed is a win-win in helping to cut back the ambient light to eliminate ghost imaging in arena situations. And if I read the manual correctly, it will work my my existing PocketWizard Plus II's. This is extremely cool, as it will keep the cost of adoption down by only requiring me to purchase a MiniTT1 transmitter. I may be interested in a FlexTT5 tranceiver later, but that can wait since my interest in TTL operations ranges from limited to non-existent.


2.16.2009

Dear Canon: Your AEB sucks.


I've been an HDR (High Dynamic Range) photography enthusiast for about a year now. Having now done hundreds, or may be even thousands, of bracketed exposure sets, I'm always on the lookout for ways to reduce the tedium of this exercise. Auto-exposure bracketing would seem to be the answer, but, if this post can be seen as an open letter to Canon, Inc., I would have to begin it thusly:


"Dear Canon,

Your Auto Exposure Bracketing sucks."

For cameras other than the EOS 1D's, (like my 5D and 40D) one can set bracket inervals up to two f-stops for up to 3 exposures. This is sufficient only for what the book I consider to be the Bible of HDR imaging calls "MDR," or medium dynamic range. It's sufficient for many of the images I have taken (including the one that serves as the banner to this blog), but certainly not all situations. The pro-level Canon 1D mark III will do up to 7 exposures at up to 3 f/stop intervals. That's much better, if you can afford the price of admission.

I was frustrated enough with the lack of Canon bracketing options that I looked into Nikon cameras. (Switching to Nikon is not something I would seriously consider for multiple reasons, but I looked anyway.) Sadly, Nikon's AEB features didn't strike me as being much better. The Nikon D300 and D700 (to name the only two cameras I have looked at), do up to 9 exposures at up to 1 f/stop intervals. Bracketing over the 9 stop range would be great, but the 1 f/stop interval limit would not be my preference. I've found that 2 f/stop bracket intervals is quite sufficient for HDR work, and the 1 f/stop intervals from the Nikon would fill up my card with a lot of data that I would never use.

There are a few possible workarounds to this:

One option would be to connect the camera to the laptop via USB cable and control it that way. I suspect the brackets could be automated, either in the Canon EOS Utility software or via other means using the Canon SDK (software development kit). I "applied" to receive the SDK last Friday, and haven't yet been notified if I will be one of the "cool kids" and be granted download of the kit. Another open question is whether I will be able to figure out how to actually make the SDK do something more constructive than take up hard disk space. I am a scripter (using AppleScript), but am by no means a software engineer.

But even if I can get an SDK solution to work, I'm not sure at all that I want to lug a laptop around while I shoot, which I sometimes do in inclement weather. Seems to me that would just be a different kind of hassle, not a solution to the the problem. So let's leave this idea aside and proceed to. . .

Arduino.

This is something I just learned of recently thanks to the This Week in Photography podcast. Arduino is a small circuit board that can be programmed from your computer when connected by a USB or serial cable and running a programming environment on Mac, PC, or Linux. I was briefly enthused by this idea, described here, which makes use of software, called Bracketmeister, engineered by a highly skilled photographer named Joergen Geerds (his blog, his portfolio). But then I realized that it operated the camera in "Bulb" mode, which means shutter speed accuracy at speeds shorter than 1 second would be dicey at best, if even possible. Many of my brackets run up into the 1/8th second range, and there is one lighted bank sign on the Indianapolis downtown skyline that is so bright it can take up to 1/60th second to keep it from burning out. (Thanks for that, Fifth Third bank.)

The Arduino board is interesting to the budding electronics geek in me and I will probably mess with it at some future time for another purpose, but it does not seem like the preferred solution for my bracketing needs.

Another possible solution I know I am not the first to think of would be using iPhone or iPod Touch as a handy, portable device for camera control. But my understanding is that these devices are "locked out" of any kind of tethering operation with non-Apple devices. And again, this would probably require programming chops I do not possess, this time with the Apple iPhone SDK.

So, for now, it looks like I'm limited to counting the clicks on the shutter speed wheel in the dark. The best approach I've found thus far is to use a combination of AEB and manual adjustments.

Here are the particulars: My cameras are set to vary the exposure settings in 1/2 stop intervals instead of the default 1/3 stop interval. This gives me the most exposure variation "per click." I first determine the minimum shutter exposure that I plan to use for my brackets by reducing exposure until the brightest area of the image no longer flashes a highlight warning on the LCD. Then I set up AEB at 1.5 stop intervals, and slow the shutter speed down by 3 clicks. This gives me a 3-exposure set with my pre-determined minimum exposure at the low end. This is not yet a high enough exposure range, of course. So I then slow the shutter speed by 9 more clicks of the Tv wheel and do another 3 exposure set. This results in 6 exposures at 1.5-stop intervals for a 7.5 stop range.

That's still more clicks than I like to count, and results in touching the camera on the tripod more than I would like. But it does yield the broadest exposure range for least tedium of any method I have found so far.

2.04.2009

Not quite early enough


We had a refresher coat of snow yesterday, so I thought I'd get an early start to try to take advantage of it for some photography. Seems I didn't quite start early enough. It was amazing how backed up traffic can get even at 6:40 AM. The route I can usually drive with only two or three stops today made me wait through at least 7 extra stop light cycles, costing me a good 10 minutes. It would have been nice to have that extra 10 minutes at my destination, which was one of my favorite views of the Downtown Indianapolis Skyline on the West side of the Canalwalk.

This photo is an HDR stitched together from 5 images and was shot with my Canon 40D and 24-105mm f/4.0L IS lens. The snow looks pretty fresh, but there were some footprints and the canal walk was probably plowed off yesterday. I'd love some fresh undisturbed snow, but the timing for that is rather unlikely for the sunrise view I prefer.

I'm pleased with the image overall, but I'd have liked to have been there a little earlier when the street lights were more in effect. Also, the sky was completely lacking in any kind of cloud activity, and that would have really added some pop and texture.

Click the play button below to take a tour of the image.

1.08.2009

They conceal information like that in BOOKS!!


I have on more than one occasion ragged on my friend and occasional shooting buddy Ron Wise to "pour yourself a seasonally appropriate beverage, ensconce your pooper in a comfy easy chair, and READ YOUR DAMN MANUAL!!"  We'll be out shooting something and he'll be fiddling with menus trying to do this or that and I show him the easy way to get there. This sometimes results in a V8-style forehead slap on Ron's part.

Well, this morning, I followed my own advice and dusted off the manual for my Canon EOS-5D for a refresher on, among other things, a few custom functions whose exact purpose had faded from memory. I discovered (rediscovered?) a nifty thing in the 5D's custom function menu. Custom function 13 allows you to specify how you manually select AF focusing points. Being a fairly dedicated manual focuser, I don't do a lot of that, but it does come in handy from time to time. Maybe I'm shooting an extended session where the subject will always be in the right hand side of the frame. Just choose a focus point in the right hand side and leave it there. Simple.

But the default selection method is just a little bit of a pain. Press the AF point select button and rotate the command dial until the point you want lights up in the viewfinder or on the top LCD. Easy enough, I suppose, but it does require re-allocating cerebral resources I'd rather devote to composition, focus, and timing. Using custom function 13, option 1, I can now use the multi-controller (the little joystick thingy just above the command dial) to choose my AF point. Just push it in the direction of the point you want to use and it's selected. No more multiple clicks of the command dial to get from a side point back to the center.

This is pretty sweet and I can't believe I used the 5D more than two years without knowing this. For users of the 40D (which is actually the camera on which I'd be more likely to do this), the equivalent custom function is in Set III (Auto Focus/Drive), function number 3, option 1.